
In today’s fast-paced business world, securing your office space is more important than ever.
With growing concern about data breaches, unauthorized entry, and employee safety, an access control system acts as a strong first line of defense. These systems not only limit entry to authorized people but also keep track of who enters and exits. Other security features like CCTV, and can even help manage employee check-ins. Installing an access control system can improve security while making your operations more efficient, whether you’re a small startup or a big company.
This guide takes you through the process step by step so you can implement it smoothly.
Before you begin, keep in mind that while some setups can be done by yourself for simple installations, more complex office environments usually need professional help to follow local rules and prevent expensive errors.
Let’s go through each step.
Table of Contents
Step 1: Understand Your Security Needs
The first step in any successful installation is to thoroughly check your office’s security needs.
Start by doing a site visit or a security audit. Walk through your building to identify all entry and exit points, busy areas, sensitive zones like server rooms or executive offices, and any weak spots like unlocked doors or windows.
Think about factors like how many employees you have, how often visitors come in, and how well the system works with existing setups like fire alarms.
During this step, make a list of who needs access to what.
For example, administrative staff might need full access to the building, while contractors might only be allowed on certain floors. Also, think about your budget and whether the system can grow with your business. This part might take a few hours to a full day, but it’s important to avoid building something that’s either too simple or too complicated. Tools like floor plans and checklists for risk assessments can help you stay organized.
Step 2: Pick the Right Access Control System

Once you know what you need, choose a system that matches.
Options include card-based systems that use RFID or proximity cards, biometric systems that rely on fingerprints, facial recognition, or iris scans, keypad or PIN entry systems, or a mix of these. For offices, cloud-based systems are great because they let you manage them from your phone or computer, which is useful for setups where people work from different locations. Biometric systems are more secure but might raise privacy concerns, while card systems are cheaper and easier to use.
Look into companies like ZKTeco, Honeywell, or ButterflyMX.
Consider features like the ability to link with HR software for automatic updates, mobile credentials, or anti-passback to stop people from following others through doors without being detected. Think about costs: a basic system for a small office might start at around â¹50,000, and prices increase with the number of doors and additional features. Always make sure the system uses strong encryption to prevent hacking. This step helps you understand the usual parts of a system, such as readers, locks, and controllers.
Step 3: Plan the System Layout and Design
Once you’ve decided on the system, it’s time to design the layout.
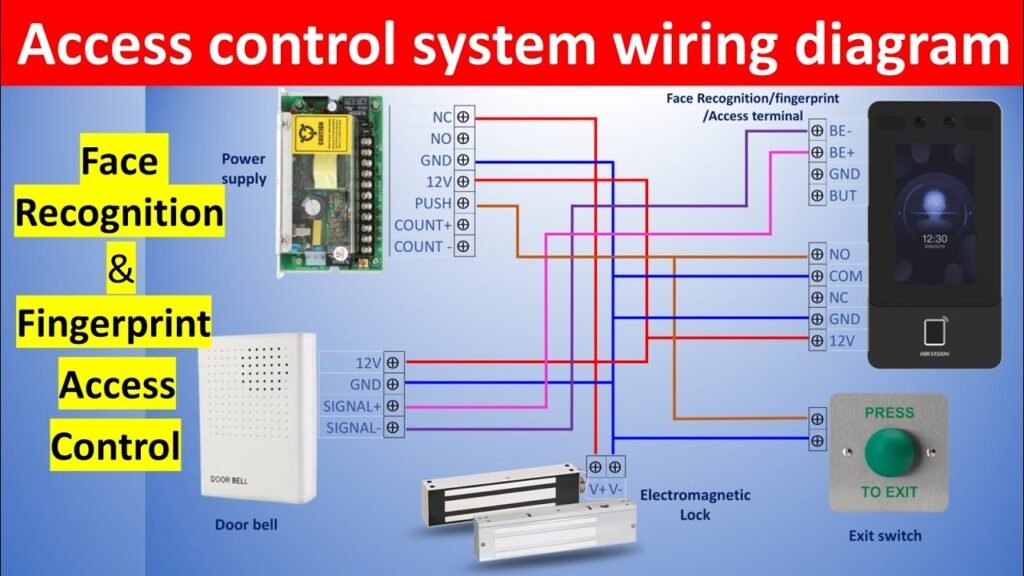
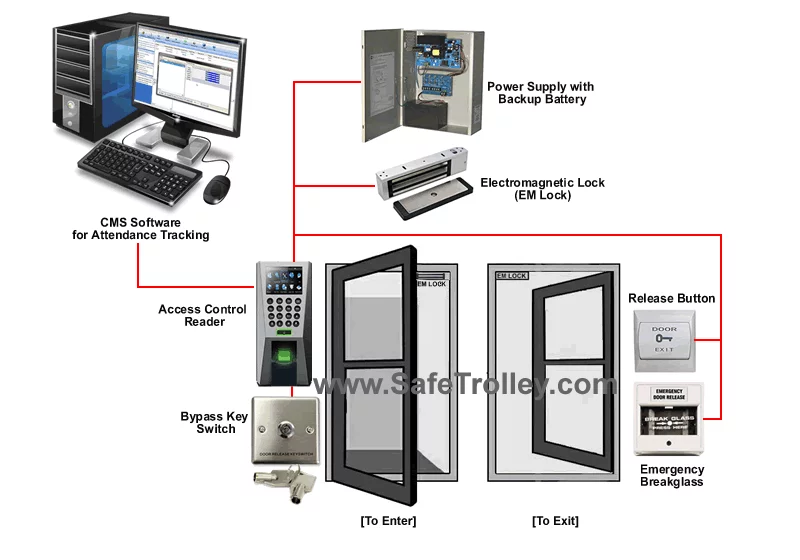
Create a clear plan showing where the readers, locks, controllers, and wiring will be installed. Make sure you identify the power sources, network connections (especially if it’s an IP-based system), and backup batteries so the system can keep working during a power outage. For offices with multiple doors, place all the controllers in a secure IT room.
Also, think about legal requirements.
If you’re using biometrics, be sure to follow India’s data protection laws. Involve your IT team early to integrate the system with your network. This phase might involve drawing rough sketches or using software like AutoCAD to make precise diagrams. If your office is rented, leave time for getting approvals.
Step 4: Gather Equipment and Components
Collect all the necessary hardware, including door readers, electric locks (like magnetic or strike locks), controllers, power supplies, cables (Cat6 for networked systems), request-to-exit (REX) buttons, door sensors, and software licenses.
Don’t forget smaller items like mounting brackets or emergency break-glass units for fire safety.
Buy from trusted suppliers to avoid fake products.
For a standard office door, you might need a maglock that can hold 600lbs, a reader that can handle up to 10,000 users, and low-voltage wiring. Also, budget for extra items like spare cards or fobs in case of loss or damage.
Step 5: Prepare the Site and Run Wiring
Site preparation involves some hands-on work.
If you’re renovating, install cables during the construction phase to avoid disruptions. For existing offices, use conduits or wireless solutions wherever possible to avoid drilling. The wiring usually includes low-voltage cables from the controller to the doors—this covers power (12V/24V), data (RS485 or Ethernet), and lock control.
Safety is key: make sure the power is turned off, use the right tools, and follow electrical codes.
In places like Bengaluru with high humidity, choose weatherproof components for outdoor doors. This step can take 2 to 5 days, depending on the size of your office.
Step 6: Install Hardware Components
Mount the hardware carefully.Place readers at a comfortable height, usually around 1.2 meters. Install locks on doors to ensure they align correctly. For glass doors, use shear locks or brackets to provide security.
Connect everything according to the wiring diagram.
Use a multimeter to test the connections and avoid any short circuits. This part of the installation may require a licensed electrician to make sure everything meets safety and compliance standards.
Step 7: Configure the Software and Database
Turn on the system and start configuring it.
Install the management software on a dedicated server or cloud platform. Add users, assign them appropriate access levels, set up schedules (like access during office hours), and connect it to other systems. Beginners can follow setup wizards in apps like those from ZKTeco.
Program the credentials: enroll fingerprints or issue access cards.
Set up alerts for any unauthorized attempts or system issues.
Step 8: Test the System Thoroughly
Testing is essential to ensure everything works properly.
Check each door: test card swiping, biometric scans, and make sure the locks engage and disengage correctly. Simulate power outages and other failures to see how the system responds.
Run through various scenarios like visitor access, after-hours entry, and emergency situations.
Keep a record of any problems and fix them. Involve end users in a trial run to get their feedback.
Step 9: Train Users and Administrators
Educate your team on how to use the system.
Hold training sessions covering how to access the system, report lost credentials, and handle emergencies. Admins should learn how to manage users, add or remove them, and handle system settings.
Provide user manuals and quick-reference guides so everyone can refer to them when needed.
Step 10: Implement Ongoing Maintenance
Schedule regular maintenance to keep the system running smoothly.
Clean the readers, update the software, replace batteries, and review system logs. Annual professional inspections can help prevent unexpected issues and downtime.
Conclusion
Installing an access control system can transform your office into a safer, more efficient space.
By following these steps—from planning to maintenance—you reduce security risks, improve productivity, and stay ahead of potential threats. Although the initial effort and cost (around ₹1-5 lakhs for a medium office) might seem high, the long-term benefits and peace of mind are well worth it. If you’re unsure about the process, consult with experts who can tailor the system to your office’s specific needs. Secure your office today for a safer tomorrow.Contact Electrocore Systems today and experience connectivity that drives real results.